
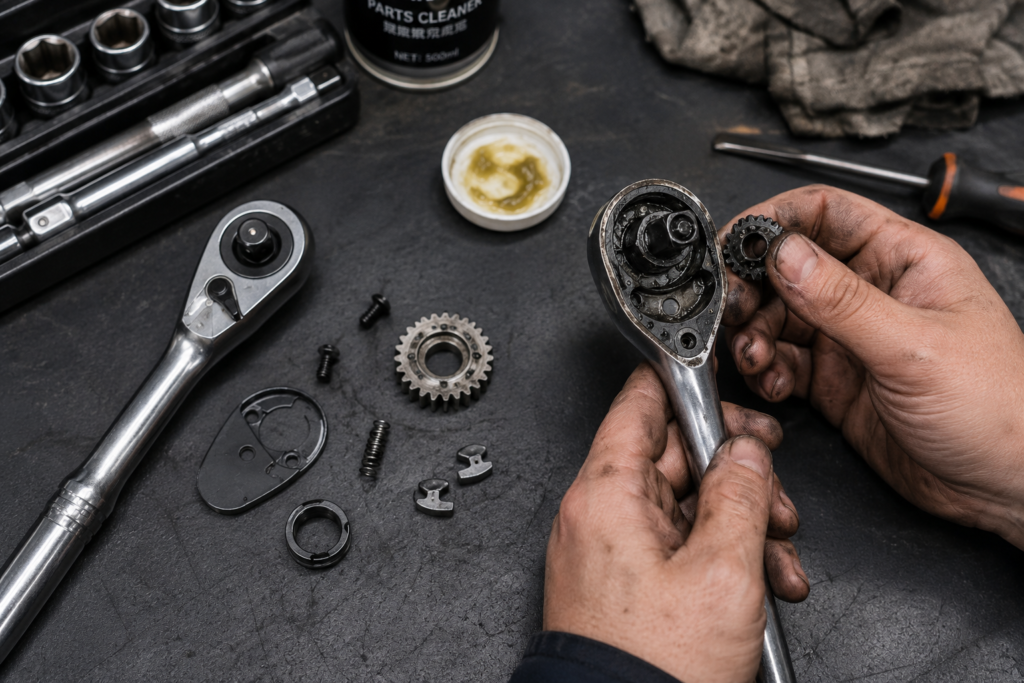
A professional ratchet wrench is an exercise in high-precision mechanical engineering. Within its compact head lies a micro-engineered system of pawls, drive gears, directional switches, and detent springs working under immense rotational shear stress.
When a ratchet begins to slip, jam, or strip under load, it halts job-site productivity and introduces serious operator safety risks. However, a failing ratchet does not always mean the tool is ready for the scrap heap. In most professional workshops, 80% of ratchet failures are easily diagnoseable and field-serviceable with the right troubleshooting steps and rebuild kits.
Here is a technical troubleshooting guide to diagnosing, repairing, and preventing the four most common ratchet mechanism failures.
Quick Diagnostic Matrix
Before disassembling the tool, identify the primary symptom to pinpoint the root mechanical cause:
| Observed Symptom | Primary Suspect | Common Root Cause | Primary Remedy |
| Drive gear skips or slips under load | Worn Pawl / Rounded Gear Teeth | Metal debris buildup, weak detent spring, or over-torquing. | Clean internal teeth; replace gear/pawls via Rebuild Kit. |
| Directional lever frozen or hard to toggle | Contaminated Head Cavity / Bent Lever | Hardened grease sludge, rust, or dropped impact damage. | Solvent flush, deep clean, and apply light synthetic oil. |
| Ratchet spins freely in both directions | Snapped / Dislodged Detent Spring | Fatigue failure of internal spring or missing pawl pin. | Install new detent springs and alignment pins. |
| Socket drops off or won’t lock on tang | Sticky / Broken Quick-Release Ball | Contaminated quick-release pin cavity or rusted spring. | Flush quick-release channel with penetrating lubricant. |
Step-by-Step Failure Analysis & Field Solutions
                  ┌───────────────────────────────────────────┐
                  │ 1. Isolate the Symptom                    │
                  │    • Slipping, freezing, or socket drop?  │
                  └─────────────────────┬─────────────────────┘
                                        │
                                        ▼
                  ┌───────────────────────────────────────────┐
                  │ 2. Perform Solvent Flush / Inspection     │
                  │    • Remove cover plate; scrub out sludge.│
                  └─────────────────────┬─────────────────────┘
                                        │
                                        ▼
                  ┌───────────────────────────────────────────┐
                  │ 3. Execute Repair or Component Swap       │
                  │    • Re-grease or drop in OEM rebuild kit.│
                  └───────────────────────────────────────────┘
1. Issue: Gear Teeth Slipping or Skipping Under Torque
- The Mechanism: When leverage is applied, the internal locking pawl must seat completely into the recesses of the drive gear. If the pawl only partially engages, high torque causes the teeth to ride over each other, rounding off the tooth peaks.
- Root Causes:
- Accumulated metal filings and packed grease preventing full pawl travel.
- Weakened or corroded pawl springs failing to push the pawl firmly into the gear.
- Excessive torque applied using cheater pipes, forcing the teeth past their mechanical yield limit.
- Solution: Disassemble the faceplate. Clean the gear teeth and pawl pockets thoroughly using an ultrasonic cleaner or solvent bath and a brass brush. Inspect tooth geometry: if teeth display rounded or sheared edges, install a fresh gear-and-pawl replacement set from an OEM Rebuild Kit.
2. Issue: Directional Switch Lever Jams or Feels Spongy
- The Mechanism: The direction lever rotates a small cam or actuator pin that flips the pawl between forward and reverse engagement positions.
- Root Causes:
- Dried, oxidation-hardened factory grease trapping dirt inside the switch cavity.
- External impact (dropping the tool head on concrete) bending the switch lever shaft.
- Solution: Remove the directional switch screw. Clean out old dried grease using electrical contact cleaner or light solvent. Inspect the switch shaft for straightness. Reassemble using a NLGI Grade 1 synthetic grease or light machine oil.
3. Issue: Ratchet Drives Freely in Both Directions (Zero Engagement)
- The Mechanism: Fine-tooth ratchets (72-tooth and 90-tooth) rely on microscopic coil or leaf springs (often under 1 mm in diameter) to keep continuous tension on the pawls.
- Root Causes:
- The detent spring has snapped due to fatigue or severe rust.
- The spring has compressed permanently and lost its elasticity.
- Solution: Replace the internal springs. When handling micro-springs during field assembly, use magnetized tweezers to prevent losing small parts inside the workshop.
4. Issue: Quick-Release Button Stays Stuck or Fails to Hold Sockets
- The Mechanism: Pressing the top quick-release button depresses an internal spring-loaded pin, allowing the steel detent ball on the drive square to drop flush so sockets slide on and off smoothly.
- Root Causes:
- Dirt or dried varnish trapped inside the narrow spring channel behind the drive tang ball.
- Internal quick-release spring rusting and collapsing.
- Solution: Spray a high-penetration lubricant (e.g., dedicated aerosol solvent cleaner) directly into the quick-release pin hole. Work the top button repeatedly until the spring action returns. If the spring remains dead, replace the drive tang assembly.
Preventative Maintenance Summary Table
| Operational Risk | Prevention Protocol | Recommended Frequency |
| Moisture / Rust Ingress | Apply light hydrophobic oil or VCI film storage | After working in wet/outdoor conditions |
| Grit & Metal Particle Buildup | Flush head cavity and re-apply light synthetic grease | Every 3–6 months under heavy daily shop use |
| Tooth Shearing / Over-Torquing | Switch to breaker bar or 3/4″ drive tools for break-away torque | Always (Never use cheater pipes on 3/8″ or 1/2″ ratchets) |


Leave a Reply